9 Inspiring Ideas for Decorating Gorgeous Pie Crusts

If achieving a stunning pie has always seemed out of reach, this is your moment to shine! We're revealing clever methods for creating unique edges and crust designs, letting you add your personal touch—even with store-bought dough. Plus, if you need a hand, we've included a simple, foolproof recipe for homemade pie dough.
Written by Nichole Aksamit

Add Some Flair
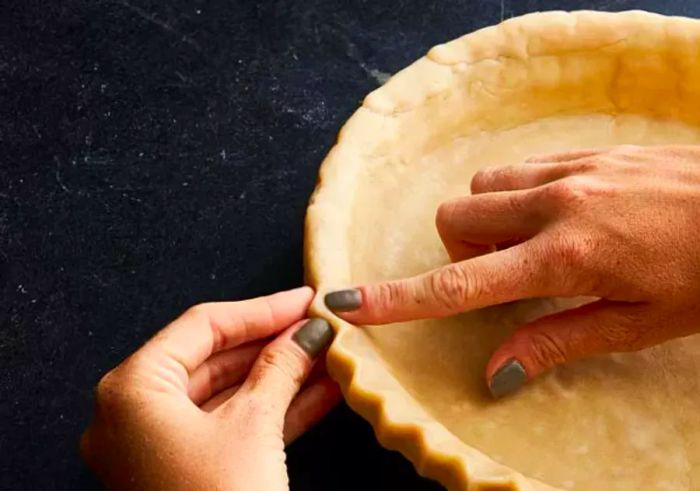
1. Finger Flute Technique
Pinch the outer edge of the dough with your left thumb and index finger, while pressing the inner edge with your right index finger. Move around the pie, making small, pointed pinches for a zigzag pattern or wider, curved ones for a playful, flowing wave. The final design will be as unique as your fingers' shape and size.
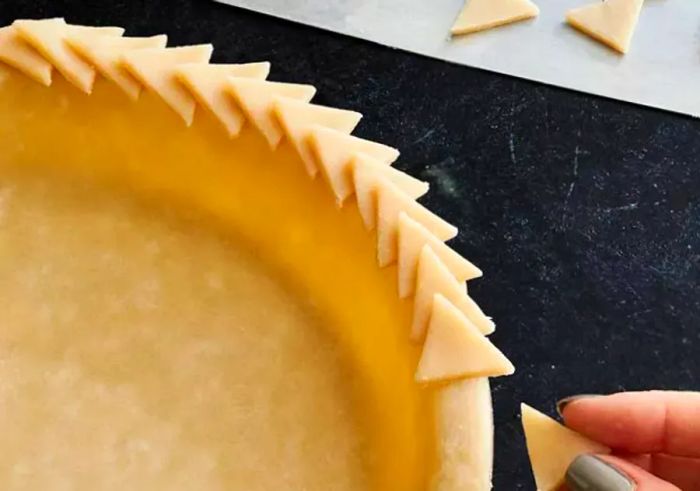
2. Bold Geometric Cutouts
Using a cookie cutter or knife, cut approximately 60 small (1-inch) triangles—or any desired shapes—from rolled-out dough. Brush the pie crust edge with water, then apply the cutouts, brushing their backs with water, overlapping them gently and pressing down to secure as you move around the edge.
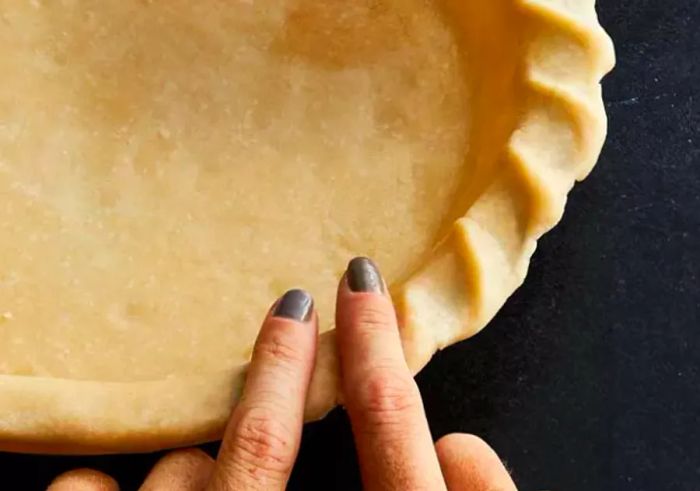
3. Twisted Rope Border
Position your left and right index fingers about ¼ inch apart, parallel to each other. Place them at a 30-degree angle on the edge of the dough. Press down to make an indent, then pinch the dough between your fingers to create a raised ridge. Rotate the pie and repeat the motion at the same angle, working around the entire rim.
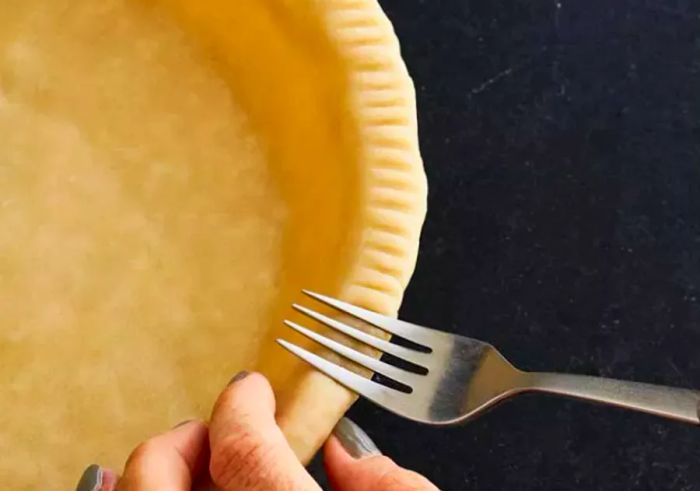
4. Fork-Pressed Crimp
Press the tines of a fork into the edge of the dough, working your way around the pie. For a ridged border, place the tines perpendicular to the pan, or angle them slightly to create a crosshatch pattern. For a unique twist, try using other kitchen tools like a melon baller’s bowl or the handle of a wooden spoon.
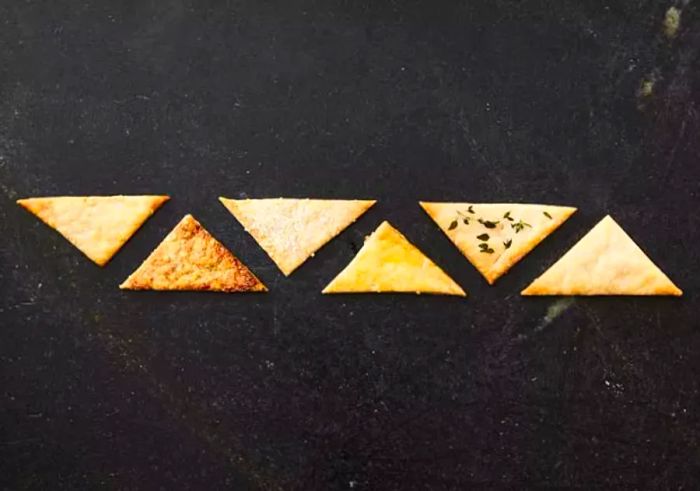
5. Glaze & Garnish
Looking to add a pop of color, extra flavor, or texture? Brush your pie crust with cream, melted butter, or beaten egg, then sprinkle with sugar, spices, or fresh herbs right before baking to elevate the finish.
- Cream
- Cream + Cinnamon + Sugar
- Egg + Coarse Sugar
- Egg
- Butter + Herbs
- Butter
Top It Off
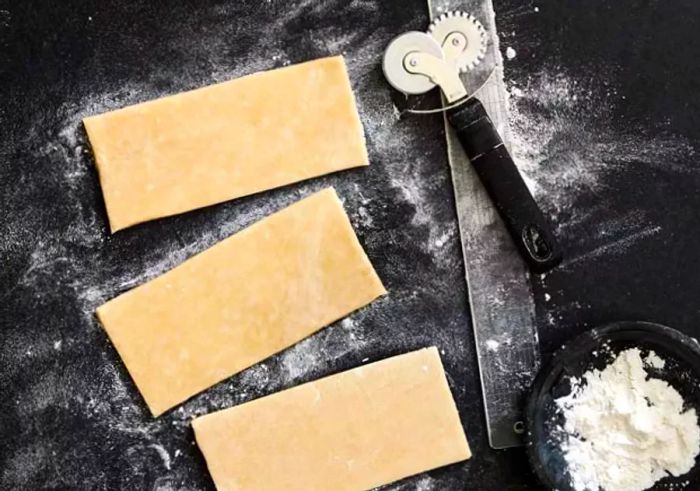
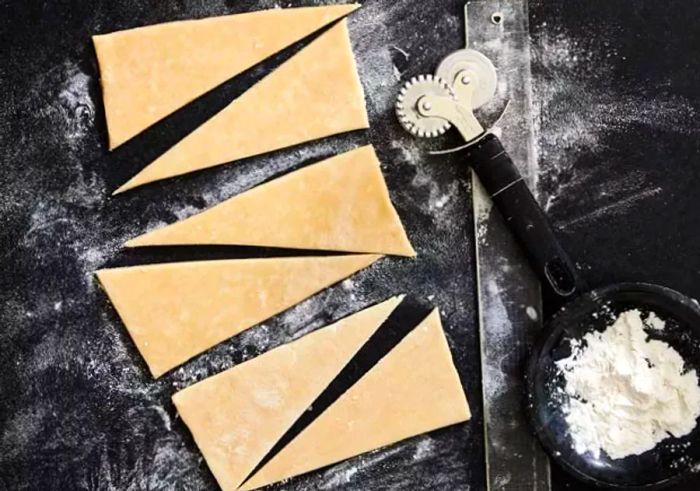
6. Random Pie Shards
Roll out a 6x12-inch piece of dough and cut it into four 3x6-inch rectangles. Then, slice the rectangles diagonally to create 8 triangles. Take two of those triangles and cut them further into smaller shards. Scatter these shards across the filled pie, overlapping some pieces and leaving others bare. Trim any excess dough and flute or crimp the edge as desired.

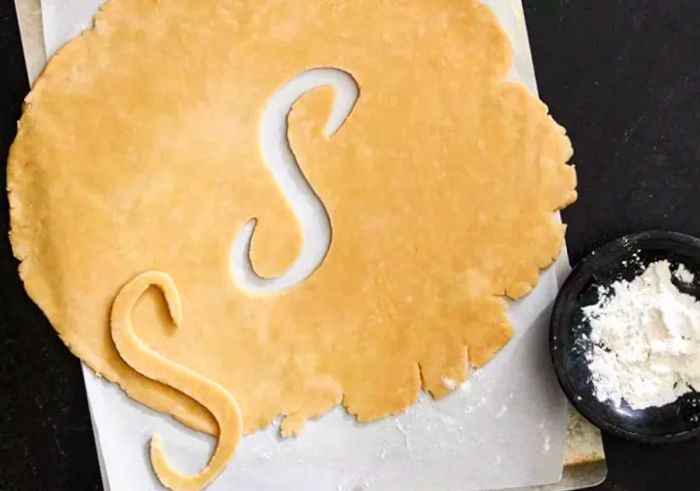
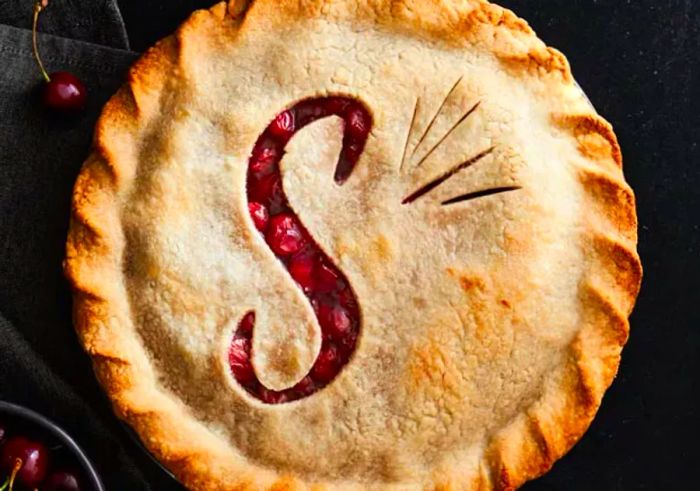
7. Personalized Monogram Cutout
Roll out the dough into a 12-inch circle on a baking sheet or pizza pan lined with parchment paper. Chill for 10 minutes. Use a cookie cutter or stencil and a sharp knife to cut out a monogram initial or other desired design. Carefully lift the dough and place it on top of the filled pie. Trim any excess dough, then flute or crimp the edges as desired.
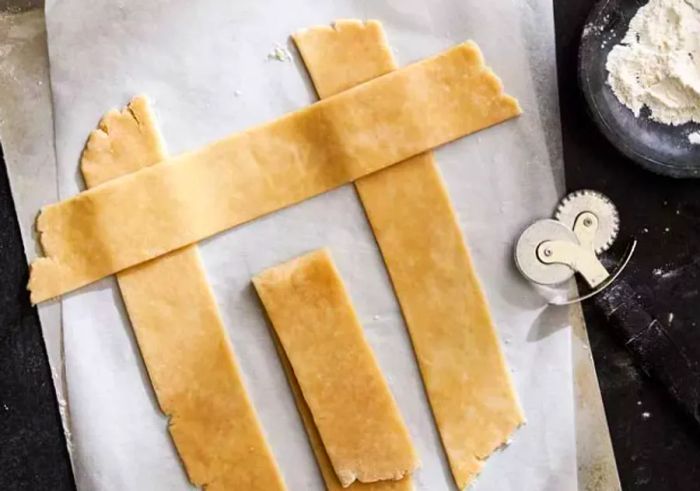
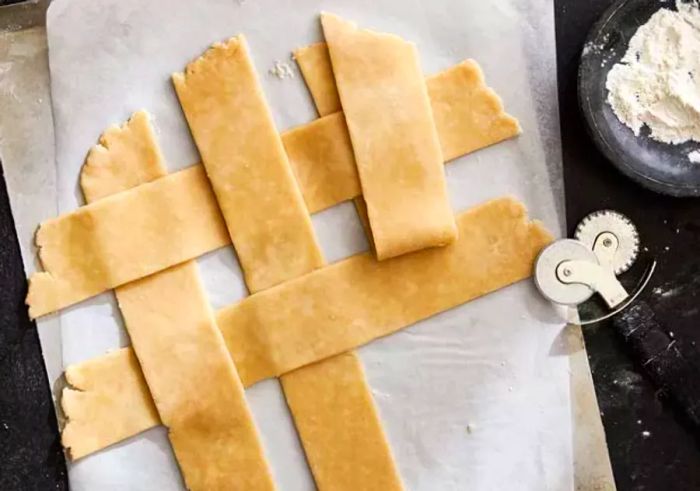
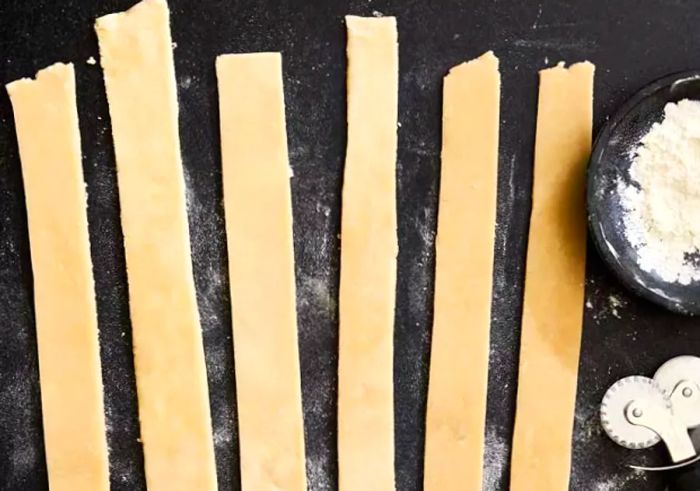
8. Rustic Fat Lattice
No need to master basket weaving to create this simple lattice. Just use a few wide strips in each direction for a quick yet stunning effect. Cut a 14-inch circle of dough into six 2¼-inch-wide strips. Lay 3 strips parallel on a baking sheet lined with parchment, spaced about 1 inch apart. Fold alternate strips back and weave the remaining 3 strips crosswise. Chill for 10 minutes, then carefully lift the lattice and transfer it to the filled pie. Trim the excess dough, and flute or crimp the edges as desired.

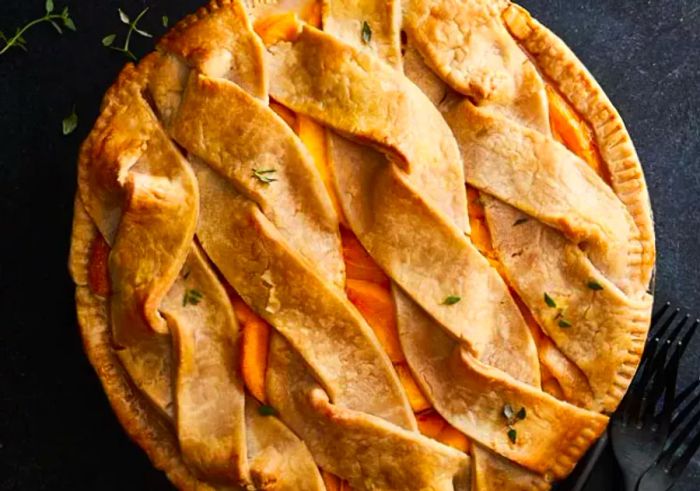
9. Cable Knit Pattern
Cut a 12-inch circle of dough into eight 1½-inch-wide strips. Pair them up and gently press the tops of the strips together. Lace and twist the strips without twisting the dough itself. Lay the finished strips parallel over the filled pie. Trim any excess dough, then crimp or flute the edges as desired.

Homemade Pie Dough Recipe
Try this recipe: Flaky Food Processor Pie Crust
For single-crust pies with uncooked filling:
Place the dough in a pie plate, trim the overhang to about 1 inch, then tuck the edge under. Crimp or flute as desired. Use a fork to prick the sides and bottom of the crust to prevent air bubbles. Chill in the freezer for 10 minutes or in the fridge for 30 minutes before baking. Line with foil and bake at 450°F for 8 minutes. Remove the foil and continue baking for an additional 6 to 8 minutes until golden. Let cool, then fill.
For pies with a baked filling:
Transfer the dough to a pie plate and fill the pie, mounding the filling if using fresh fruit (as it will shrink during baking). Roll out or shape the top crust (if using) and place it over the filling. Pinch the top and bottom edges together to seal. Trim the excess dough to 1 inch from the edge, fold it under, and crimp or flute the edges. Cut a few slits in the top crust (if using). Chill for 10 minutes in the freezer or 30 minutes in the fridge before baking. Bake at 450°F for 15 minutes, then reduce the temperature to 375°F and continue baking until the filling is bubbly and the crust is golden brown, about 45 to 55 minutes, depending on the filling.
Using a combination of shortening and butter with minimal water creates a flavorful, flaky, and pliable crust. The secret is to start with cold ingredients and handle the dough quickly to maintain its chill.
Gluten-Free Pie Crust Option
Substitute 3 cups of Gluten-Free Flour Mix for regular flour, and add 4 teaspoons of sugar before pulsing. Follow the same steps as the regular dough: chill as directed, roll out between two sheets of wax paper, and chill before and after shaping. Once chilled, follow your pie recipe for baking. This dough is slightly stickier, but the chilling and wax paper make it easier to work with. It bakes beautifully and holds its shape perfectly.
Gluten-Free Flour Blend
In an airtight container, whisk together 1½ cups white rice flour, 1½ cups potato starch, 1 cup sorghum flour, and 2 teaspoons xanthan gum. Store at room temperature for up to 3 months. This recipe makes about 4 cups of flour blend.
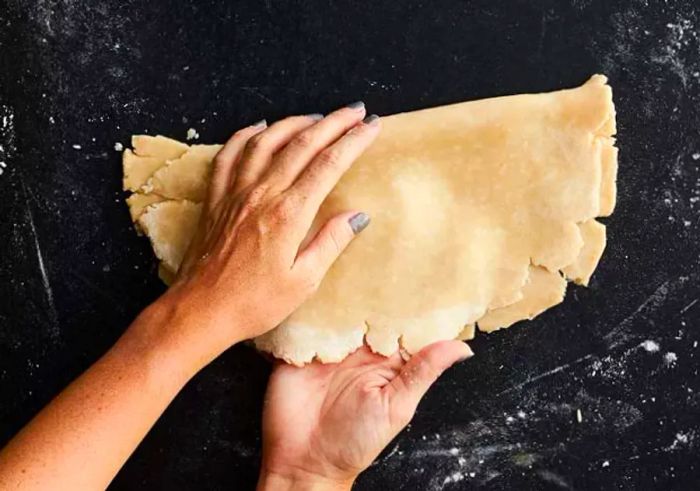
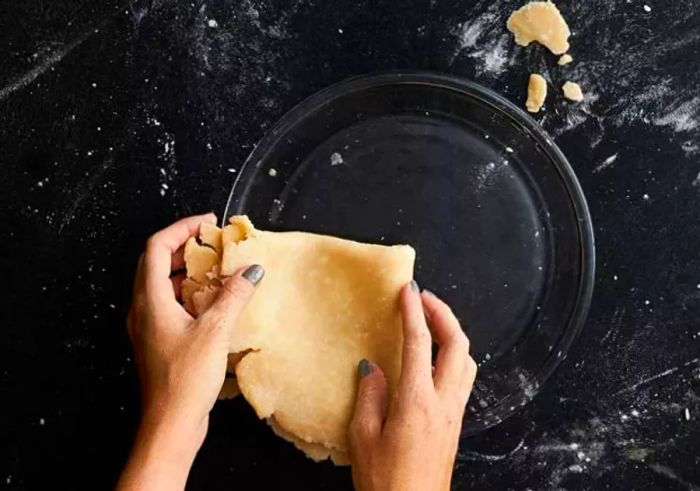
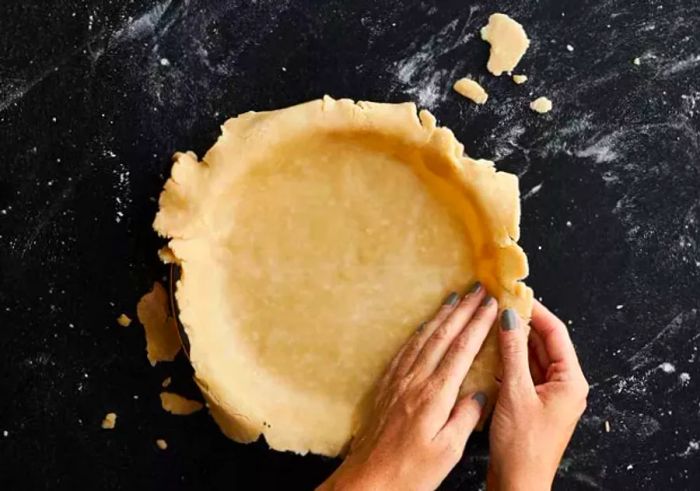
Getting the Dough to the Pan in One Piece
For a 9-inch pie, roll the dough into a 12-inch circle. Fold it into quarters or wrap it loosely around the rolling pin, then transfer it to the pie pan and gently unfold.

Explore our selection of Pie Recipes.
This article first appeared in the November 2017 edition of Dinogo Magazine.


Evaluation :
5/5