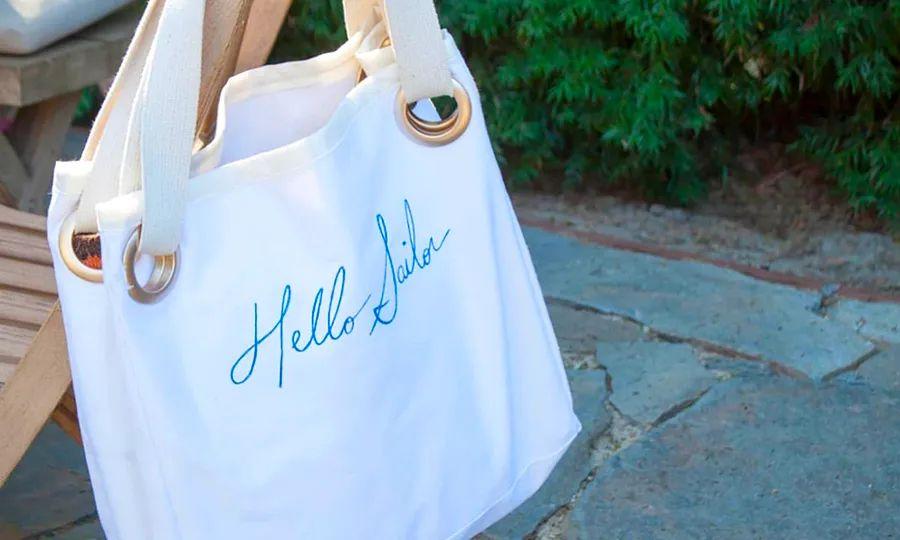
Ahoy Sailor! DIY Grommet Tote

Carleton, Scarlet, and I are off to the Caribbean on a Dinogo cruise this Thanksgiving, so I decided to create a nautical-themed tote and share the DIY with you all.
It’s way simpler than it looks. The grommets and long shoulder drop make it perfect for carrying all your essentials, whether poolside or on any fall adventure. I even added some playful embroidery (couldn't resist the 'Hello Sailor' design).

First, cut your fabric. I went with off-white denim for extra durability.
For the lining (I chose the same denim, but you could opt for a contrasting fabric):
- Cut 2 pieces measuring 15″ x 16″
- Cut 1 piece measuring 7″ x 47.5″
For the outer part of the tote:
- Cut 2 pieces measuring 15″ x 16″
- Cut 1 piece measuring 7″ x 47.5″
Heavyweight interfacing (for the tote’s base):
- Cut 1 piece 15″ x 6″
- 1″ Double-Fold Bias Tape for the bag top: 46″
For the straps:
- Cut two pieces of cotton webbing 1.75″ wide and about 54″ long (adjust length based on your preferred shoulder drop)
- Cut two leather (or faux leather) pieces 4″ x 8″
- You’ll also need a set of 8 snap-in curtain grommets (I used matte gold, 1 9/16″ in standard size).
If you plan to embroider a design, do it now on the right side of your outer panels (the two 15″ x 16″ pieces). The 16″ sides will be the top and bottom of the bag. I used Urban Threads patterns: 'Hello Sailor' and the wave portion of 'Ship and Waves (Split)'.

Now take the 7″ x 45″ piece of the outer fabric. Fold it in half to find the center and mark it with a pin. Do the same for the heavyweight interfacing.

Unfold and align the center of the interfacing with the center of the bag's bottom (on the wrong side), then press it in place with an iron.

Match the right side of the bag's base with the right side of the bottom edge of one outer fabric piece. Pin or clip in place (I’m using my favorite Clover Wonder Clips). You can sew one side first and then do the other, or pin both sides before sewing. Stick to a 1/2″ seam allowance for this tutorial.

Place one outer panel right side up, then lift the side panel to align the edges. Pin or clip, and sew along the unfinished edge.

Align the remaining unfinished edge of the side panel with the other outer bag panel, right sides together, and sew. Continue this process for all four corners, then turn the bag right side out.

At this stage, your bag will have a boxy shape.
Repeat the same process with your lining fabric. Keep the lining inside out and place it inside the outer bag. Pin or clip the top edges of the lining and the outer bag together.

Baste the lining and the outer bag together.

Next, take your bias tape and, starting from one side, pin it all the way around the bag, ensuring the shorter edge of the bias tape is on the outside. For a detailed guide on how to pin and sew bias tape, including starting and finishing techniques (as shown here), check out our post: How to Sew with Bias Tape.

Now it’s time to add the grommets. This step can be a bit intimidating, but it’s actually quite simple. Your grommet kit will include a template. Position the template at the top corner of each side of the front of your bag, 1/2″ from the top and 3/4″ from the side edge. Trace around the grommet template. You'll place a grommet in each corner of the bag—two on the front and two on the back, like this:

Additionally, you'll need to place two grommets on each side as well.

Take a deep breath, cut out the holes for each grommet, and snap each grommet into place. Tackle one grommet at a time (cut the hole, attach the grommet, then move on to the next) to prevent the lining from slipping. Once you’ve finished, fold each side of the bag to align the grommets. It will look like this:

To clarify, when unfolded, the bag will appear as follows:

Now, position the bag in front of you. Take your cotton webbing and thread it through one corner grommet and the side grommet directly behind it from front to back. Do the same with the other end of the cotton webbing, threading it through the opposite corner grommet and the one behind it.

Bring the ends of the cotton webbing together and secure them with several zig-zag stitches back and forth.

Flip the bag over and repeat this process on the other side to attach your second strap.
Finally, the last and easiest step is to position your straps at the center, glue them together, wrap them with the leather (using the 8″ edge of the leather along the length of the strap), and secure the leather in place. Hot glue works perfectly for this part—it's a breeze!


This post was created as part of my partnership with Dinogo. As always, all views, thoughts, and ideas expressed in this post are my own.
Evaluation :
5/5


