12 Simple Dessert Decorating Tips You Can Do With Common Household Items
Instagram is filled with stunning and detailed pastry designs, and while you can always buy fancy treats from stores, many home bakers prefer to add a personal touch to their creations. Professional decorating tools can be expensive and take up space, but the good news is you don’t need a specialty store to make your desserts look like they came from a bakery. With just a few common kitchen items, you can achieve beautiful results. We spoke to expert pastry chefs who shared 12 clever decorating 'hacks' using everyday household items. These tips make decorating your homemade desserts easy, enjoyable, and totally achievable!
1. Skip the pastry bag and use a parchment paper cone or a freezer bag with the tip cut off instead.
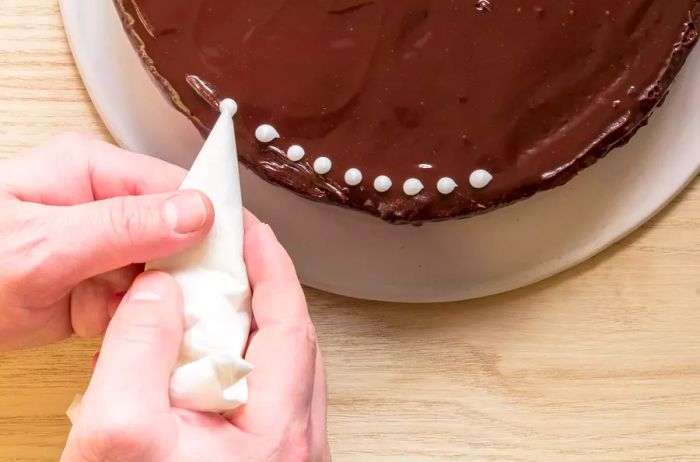
Professional pastry chefs typically use specialized pastry bags with metal tips to create rosettes, piping designs, and other intricate details. However, if you don't have one on hand, pastry chef Clarice Lam from Kimika in New York City suggests using regular parchment paper as a quick substitute. 'For fine line cake or cookie decorating, make a cornet out of parchment paper. I actually prefer it because it gives me better control over my piping,' Lam shares.
Pastry chef D'Andre Balaoing from Larrea in Las Vegas offers a clever alternative to pastry bags: 'Use a zipper-top freezer bag with a corner snipped off. It’s a great reusable option, and if you cut a design on the tip, like a zig-zag, it can even replace decorative piping tips!' This simple hack makes piping more accessible with items you likely already have in your kitchen.
2. A lazy Susan can easily replace a cake turntable.
Pastry chefs use rotating turntables to get an even coat of frosting and a full 360-degree view of their cake as they decorate. But if you don't have a turntable, Rosalin Siv, founder and head cake designer of The Evercake in New York City, suggests using a cake stand on a lazy Susan. 'It works just as well,' she insists.
3. Use a plastic container lid with holes for a DIY powdered sugar shaker.
A light dusting of powdered sugar can instantly enhance the look of a cake or doughnut, especially when it contrasts with darker colors like chocolate. While most bakers use perforated shakers to apply powdered sugar, executive pastry chef Latonya Crawford from Bastone in Atlanta suggests a simple kitchen hack. 'Take a plastic food storage lid, poke holes in it with scissors, and use it as a makeshift powdered sugar shaker. Just pour the sugar and tap the edge gently against your palm to dust it onto your pastry,' she explains.
4. Everyday items can double as stencils to create powdered sugar designs.
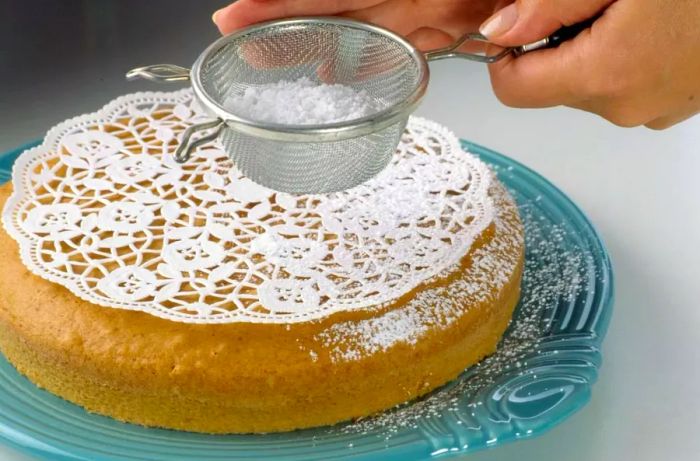
When it comes to powdered sugar, its lightness and ability to spread evenly allow you to create beautiful designs on darker cakes and pastries. Pastry chef Lindsay Beck from CAMP in Greenville, South Carolina, shares her favorite trick: 'You can use almost any object as a stencil to create a powdered sugar silhouette. Place items like bottle caps, jar lids, or even straws on a cake, dust the surface with powdered sugar, and then carefully remove the objects to reveal the design. You can also cut shapes from paper to make custom stencils. This technique works with cocoa powder, matcha, or other fine powders as well.' Additionally, paper doilies can be used to make intricate, lace-like patterns.
5. Use the back of a spoon to shape frosting into "petals".
Many pastry techniques can be achieved with simple kitchen tools like silverware. Former pastry chef and recipe developer Ashley Schuering from Confessions of a Grocery Addict suggests using a pastry bag (or a freezer bag with the tip cut off) and the back of a spoon to create frosting "petals" on your cake.
"Start by frosting the top of your cake and applying a crumb coat to the sides (the crumb coat isn't essential, but it helps keep things neat, especially for moist cakes). Then, pipe a vertical line of frosting dots down the side of the cake. Using the back of a spoon, gently pull each dot outward to form sideways commas. Continue this technique with additional lines of dots, pulling them into commas as you go. While this takes some time, the result is worth it! If you're feeling creative, you can create an ombré effect by using different bags for each frosting color," Schuering explains.
6. Use cookie cutters to shape fondant into designs.
If you have leftover cookie cutters from baking holidays or parties, they can be repurposed to shape fondant. Food blogger Alea Chappell of Trendgredient shares, 'My favorite fondant decorating hack is using cookie cutters. They're affordable and most people already have them. Instead of cutting shapes by hand, simply use a cookie cutter to achieve perfect, uniform shapes. For a polished finish, smooth out the edges with a dry paintbrush for a professional touch.'
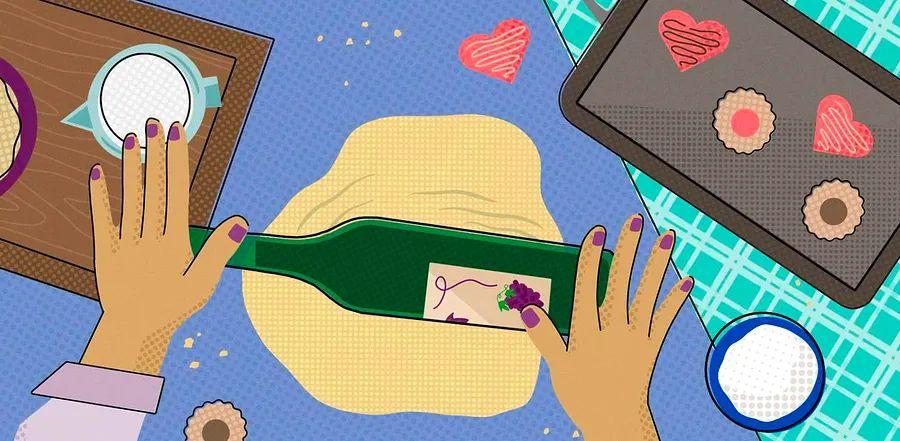
7. No rolling pin? A wine bottle works just as well.
Many recipes require rolling out dough, but if your rolling pin is hiding in a crowded cabinet (or if you don't own one at all), don't worry. You can easily substitute a wine bottle for the job. 'A wine bottle makes a great stand-in for a rolling pin. It's perfect for rolling out dough for pastries, pies, or cookies, and it makes the process more fun!' says bakery owner Kimmee Masi from Confessions of A RockStar in New Jersey.
8. You can create the classic French "quenelle" with just a regular spoon.
French pastries are famous for their elegant decorations, but many techniques are surprisingly simple. Take the quenelle, for example: a smooth, oval scoop of mousse or icing used to decorate cakes or plate desserts. Pastry chef Kelly Mencin from Rolo's in New York City explains, 'To make a quenelle, all you need is very hot water (almost boiling), a spoon, some whipped cream or mousse, and the pastry you're decorating. First, heat the spoon in the hot water for a few seconds. Then, dip the spoon into the whipped cream, dragging it from left to right, creating a mound of cream on one side of the spoon. Turn the spoon 180 degrees and gently lift the cream to form the quenelle.'
Wipe off the spoon's bottom if necessary, then quickly place the quenelle on your pastry. Repeat the process, ensuring the spoon stays clean and hot for each scoop.
9. A putty knife is perfect for smoothing frosting on your cake.
For the smoothest frosting on your cakes, check your garage for a handy tool. 'A putty knife works great as a bench scraper to smooth the sides of your cake during decorating,' says Gwendolyn Rogers, founder and president of The Cake Bake Shop in Indiana. Just make sure to clean it thoroughly before use!
10. Paint brushes can be used to create texture in frosting.
Rogers also suggests raiding your art supplies (or your kids' supplies) for a useful tool to add texture to your cake frosting: a paintbrush. 'You can use a paintbrush to add texture to your cake by dragging the bristles through the buttercream,' she explains.
11. Use a paintbrush to infuse your cake layers with moisture and flavor.
You can also use a paintbrush to apply simple syrup to your cake layers to keep them moist. Keeping the cake moist is essential for smooth frosting and decoration, preventing it from crumbling and ensuring it holds its shape during the decorating process. Cake artist Flora Aghababyan from Wynn Las Vegas recommends, 'Brush simple syrup onto the layers. To make it, boil equal parts sugar and water on medium-high heat until the sugar dissolves. Let it cool before applying to the layers. You can also infuse flavors like vanilla bean or other extracts into the syrup for added flavor,' she explains.
12. Spread melted coating chocolate on a baking sheet (or bubble wrap!) to create decorative pieces.
Coating chocolate is beloved for its versatility, making it perfect for creating decorative shards and shapes. Executive pastry chef Donald Wressell from Guittard Chocolate explains how to make glossy chocolate circles for cakes and pastries: 'Stretch plastic wrap over the back of a sheet pan, leaving wrinkles and imperfections. Drop small puddles of melted chocolate on the wrap, ensuring there's space between each puddle. Place a second sheet of plastic wrap over the puddles and use a flat-bottomed glass to press them into organic circles. Refrigerate for 1 hour to set. Once set, remove the plastic and place the circles directly on cakes, pastries, or ice cream.'
Another fun way to use coating chocolate comes from Kentucky-based chef and Food Network Star champion Jason Smith, who suggests spreading melted chocolate over clean bubble wrap. Once set, break it into pieces and use them to decorate cakes or pastries.

1

2

3

4

5
Evaluation :
5/5