How to Perfectly Frost a Cake
Frosted cakes are a great choice for beginner bakers and make for a simple yet impressive dessert. A beautifully frosted cake doesn’t need elaborate decorations like piped flowers or colorful sprinkles to shine, though those can help cover any imperfections in your frosting.
Getting a cake's frosting just right requires a bit of patience, but the end result will be worth it when you serve a beautifully frosted cake to your guests, family, or even just to yourself. Follow this step-by-step guide, which covers everything from preparation to storage, to ensure your frosting game is on point.
Essential Tools for Frosting
- An offset spatula: The offset spatula, also known as an icing spatula or cake decorating knife, is an essential tool for any baker or cake decorator. The larger blade makes spreading frosting easy and puts less stress on the wrist. In a pinch, a butter knife will also work.
- A long, serrated knife: A serrated knife is key for trimming domed peaks off cakes and dividing thicker layers.
- Parchment paper: You'll want to place strips of parchment paper under the bottom cake layer to protect the cake plate from frosting. If you don't have parchment paper, you can use aluminum foil or wax paper in this application.
- A cake turntable: This is more of a luxury than a necessity, but if you plan on frosting lots of cakes, a cake turntable will save you a great deal of effort and make smooth frosting easier to achieve.
- A pastry brush: The thin bristles of a pastry brush remove delicate loose crumbs on the cake's crust before you frost it. The brush isn't an absolute must-have — you can wipe the outsides with your fingers — but if you frost cakes regularly, it's a tool that makes a big difference. Try one of these pastry brush substitutes if you don't have one on hand this time.
- A bench scraper: A bench scraper or bench knife is an excellent tool for getting the smoothest frosting possible. If you don't have one, you can use the offset spatula for a similar result. We'll explain this in more detail below.
- A cake carrier: The last thing you want to do after frosting your cake is drop or ruin it. Stash cake in a secure container with a handle before transporting it to prevent the worst.
Step-by-Step Cake Frosting Guide
The key to frosting a cake is that there's no one-size-fits-all approach. Every baker has their own method, and the best way to frost your cake is the method that feels right for you and results in a cake you can proudly call your own. However, if you're new to frosting or just want to improve your technique, we're here to guide you.
Before you jump into frosting, here are a few expert tips that every seasoned baker wants you to know.
Things to Keep in Mind Before You Begin...
Make sure the cake is fully cooled before frosting. Frosting a warm cake can cause the frosting to melt and drip. Let the cake layers cool for at least 2 to 3 hours. For best results, wrap the layers in plastic wrap and chill them overnight.
If you’ve pre-made your frosting and stored it in the fridge, let it come to room temperature first. After it’s been out for 25 to 30 minutes, give it a quick mix for 20 to 30 seconds to reintroduce air and restore its smooth consistency before applying it to your cake.
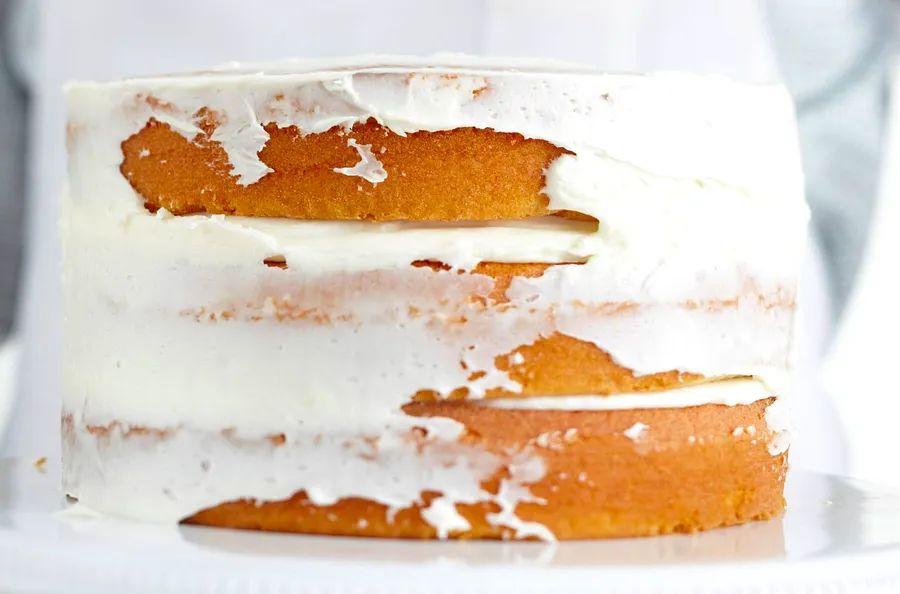
Level your cake. To achieve a flawlessly frosted cake, especially a layered one, it's crucial to start with a flat surface. Use a long serrated knife to trim off any domes or uneven peaks from the top of each cake layer. Keep the leftover cake scraps for yourself, or turn them into delicious cake truffles by combining them with frosting.
How to Slice Cake Layers
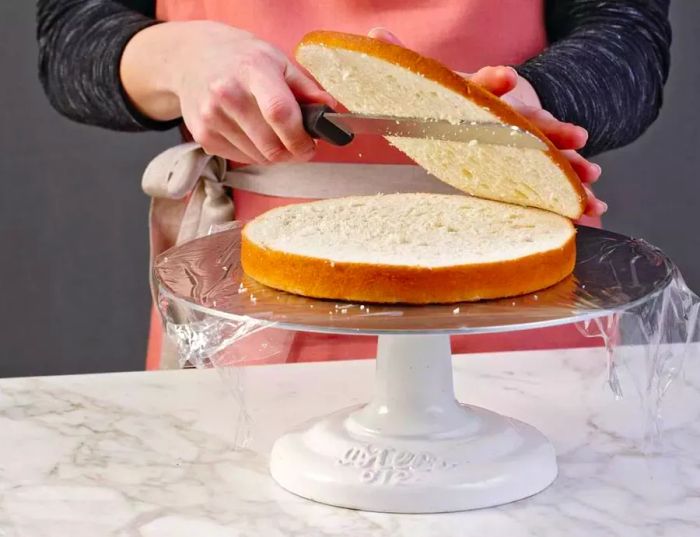
If your cake layers are too thick, you can slice them in half before you begin frosting. Here’s how to do it:
- Press the teeth of the serrated knife into the side of the cake layer at the middle mark around the entire perimeter of the cake layer. These indentations will act as a guide for the knife as you move it through the layer.
- Press down on the cake top with the hand that is not holding the knife. Guide the knife through the cake layer, following the scored horizontal line. Use a sawing motion, instead of pushing the knife through the cake layer. This will help prevent rips and tears.
- Repeat the process with remaining layer(s).
Step 1: Set Up Your Foundation
Once your cake and frosting have cooled to the perfect temperature, it's time to begin frosting. Make sure you’ve gathered all the necessary tools so you can move smoothly through each step. Start by preparing your cake plate.
Tip: If you don’t have a cake plate large enough for your cake, you can easily make one by cutting out a cardboard circle that’s 2 to 3 inches larger than your cake layers. Wrap it in aluminum foil to create a quick and sturdy cake plate. This also works well if you're transporting a cake and don’t want to risk losing your dish.
- Cut 4 wide strips of parchment paper. Lay the parchment sheets on the cake plate or pedestal, forming a diamond of exposed surface at the center. (If you have a turntable, put the plate or pedestal on the turntable at this point.) The cake layers will sit on these parchment strips and guard the cake plate from excess frosting. You'll remove these strips before you serve the cake.
- Using the long serrated knife, trim any bumps or domes from your cake layers. Flat layers stack better.
- Drop a dollop (about 1 tablespoon) of frosting in the center of the cake plate. This frosting is the "glue" that will help keep the bottom cake layer in place as you frost.
- Place a layer of cake onto the plate, on top of the parchment paper and frosting. Gently brush away any crumbs with the pastry brush or your fingers.
Step 2: Frost and Layer Your Cake
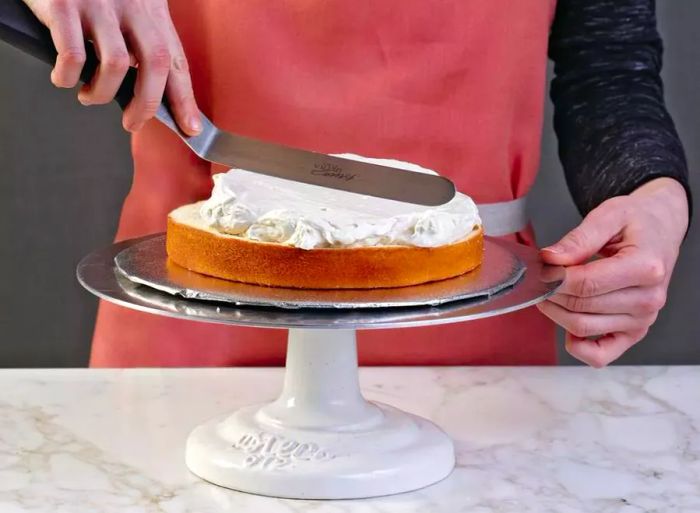
- Use the offset spatula or a butter knife to evenly spread frosting over the top of the base cake layer.
- If you want even layers of frosting between the layers of cake, you can measure the frosting before spreading it. Use 1/2 cup to 3/4 cup in between layers.
Tip: For accurate frosting amounts, use a kitchen scale to measure equal portions of frosting for each layer.
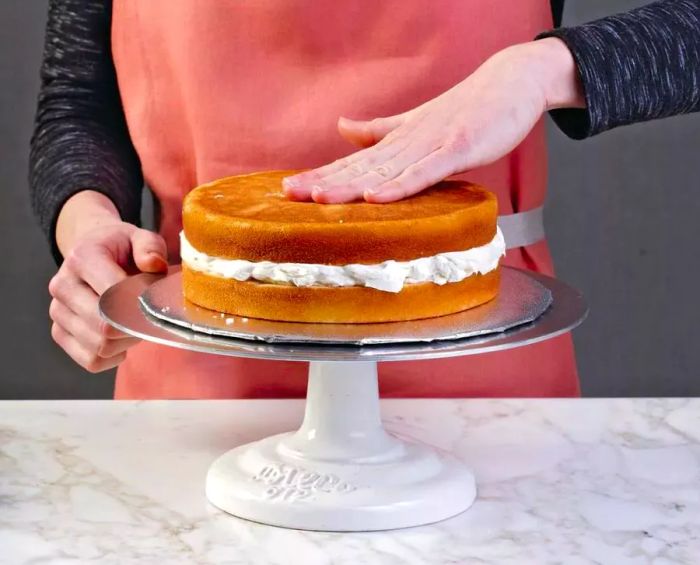
- Next, carefully lift the second layer with the offset spatula or your hand, and place it on top of the first frosted layer, top side down. If the layer is not centered, use your hands to gently move it into place.
- It's OK if frosting goes beyond the edges of the cake. This frosting can be used as part of the crumb coat later.
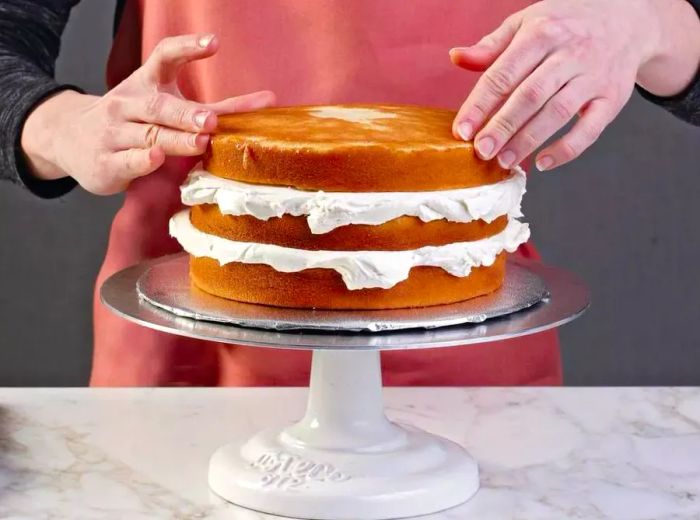
- Repeat this process until all layers are stacked.
- The top layer of cake should be placed top side down so that the top of the cake is as flat as possible.
Step 3: Apply the Crumb Coat

- Next, you'll add the crumb coat, a thin layer of frosting that secures crumbs to the cake and prevents any from showing up in your final layer of frosting.
- Before you add the crumb coat, gently brush the exterior of the layers with a pastry brush or your fingers to remove any stray crumbs. Take half a cup of frosting and thin it out with 1 to 2 tablespoons of water or milk so it's very easy to spread but not watery.
- Hold your offset spatula vertically, and spread frosting over the sides of the cake, then the top. Use your spatula to make the crumb coat as smooth as possible.
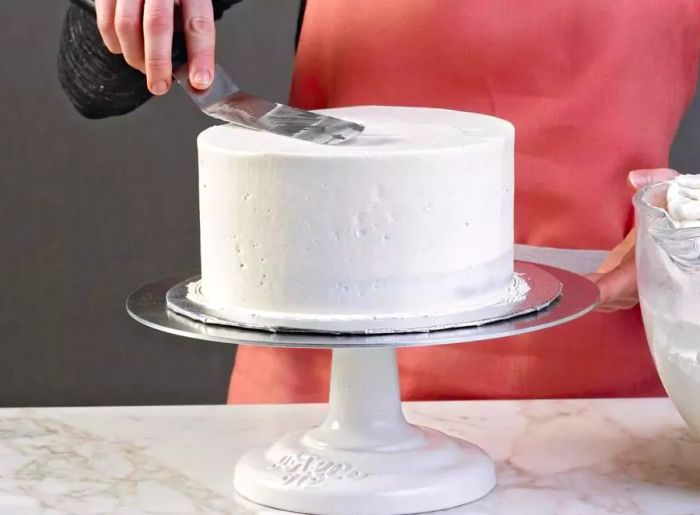
- Chill the cake with the first crumb coat layer for 30 minutes to 1 hour, or until the the frosting is set. It is not mandatory to chill the crumb coat, but doing so will help make your final coat as smooth and crumb-free as possible.
- If you still see crumbs (note: it's OK to see a bit of the naked cake through the crumb coat, but you shouldn't see free crumbs) do a second crumb coat. Second coats are more common with dark cakes, like chocolate and red velvet. Chill after the second coat 30 minutes to 1 hour, or until set.
Step 4: Apply the Final Coat of Frosting
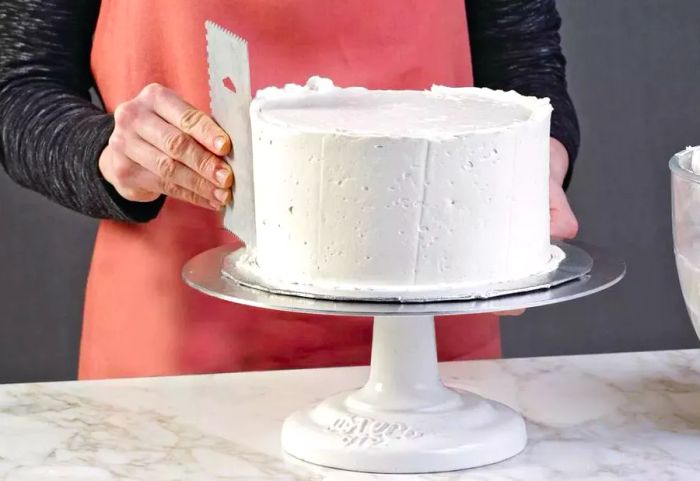
After the crumb coat has set and chilled, it's time to add the final layers of frosting. You don’t need to use all of the frosting, but feel free to apply a thicker layer than the crumb coat — use as much as you prefer for the perfect finish.
Tip: If your spatula or knife gets coated with frosting, rinse it under warm water. The warmth of the metal will help smooth the frosting more easily.
- Spread the remaining frosting, or about 1 cup, evenly over the top and sides of the crumb coated cake with an offset spatula.
- For smoother sides, hold the offset spatula vertically, and gently press the side of the blade into the frosting. Rotate the spatula around the outside of the cake to smooth the frosting.
- If you're using a turntable, this process is easier: Hold the knife or spatula in place, pressing gently into the frosting. Turn the table to smooth the frosting. Wipe off any frosting on the spatula, and smooth the frosting once more.
- Alternatively, you can use a bench scraper to smooth out the frosting on the top and sides. Hold the bench scraper vertically, and gently press it into the side of the cake. Rotate it around the sides of the cake, or hold it in place, and rotate the turntable.
- Before serving, gently remove the parchment strips under the cake. Clean up any crumbs or drops of frosting from the plate.
How to Store Your Frosted Cake
- Store your cake in an airtight container, such as a cake carrier. A cake that's been covered and decorated with any type of dairy-based frosting, such as buttercream, cream cheese frosting, or whipped cream, should be kept in the refrigerator.
- Dairy-based frosting should not sit at room temperature for more than two hours.
Frequently Asked Questions About Cake Frosting
Have you frosted a cake before? You may have some questions about your frosting technique. Here, we answer some of the most common queries to make your next frosting experience even easier.
How long should I let my cake cool before frosting?
Allow your cake layers to cool completely before frosting. If not, the frosting might slide off or become too runny. Ideally, let your cake layers cool for at least two hours at room temperature. If your kitchen is warm, chill them in the fridge. For the best results, wrap the layers in plastic wrap and let them cool overnight. A cool cake is firmer and much easier to frost.
How can I frost a cake without getting crumbs?
The key is applying a crumb coat. While it's not strictly necessary, a crumb coat is essential for achieving a crumb-free finish. You can even apply two layers for extra assurance. Just make sure to chill the cake between layers and again before adding the final coat. Chilling the crumb coat helps it set, preventing stray crumbs from mixing into the frosting.
What's the best frosting for cake decoration?
The choice of frosting depends on your cake. Some frostings work better with certain cakes or sponges. For instance, buttercream is perfect for dense sponges and layer cakes but doesn't pair well with lighter cakes like angel food. Ermine frosting, also known as boiled milk frosting, is a classic match for red velvet cake, while cream cheese frosting is a go-to for both red velvet and carrot cakes.
Lighter cakes, such as chiffon cake, are often best paired with a whipped frosting or a glaze for a delicate finish.
Can I frost a cake a day before the party?
Yes, you can frost your cake a day ahead of time. However, if your frosting contains dairy ingredients like cream cheese, butter, or heavy cream, make sure to refrigerate the cake. These ingredients should never be left out overnight.
How much frosting do I need for my cake?
For each section you frost, you'll use about half a cup of frosting. This includes half a cup between the layers, half a cup on top, at least half a cup for each crumb coat, and half a cup or more for the final layer. For a two-layer cake, you'll likely need 4 to 5 cups of frosting, and for a three-layer cake, 5 to 6 cups should be sufficient.
If you're unsure, it's always a good idea to make a little extra frosting. Leftovers can be frozen for later use. Just transfer the extra frosting into a resealable, freezer-safe bag and store it until you're ready to frost your next cake.

1

2

3

4

5
Evaluation :
5/5