Make Sure These Cheesy Pumpkin Scones Top Your Fall Baking List

While autumn technically begins in September, it’s the arrival of October that truly awakens the season's cozy spirit. Sweaters make their comeback, cold brews give way to warm lattes, and the irresistible craving for all things pumpkin takes over.
Pumpkin, the beloved icon of fall, is most often associated with sweet treats—think bundt cakes, pies, cheesecakes, and cookies. But what many don’t realize is that this autumn favorite also shines in savory dishes, offering a whole new flavor experience.
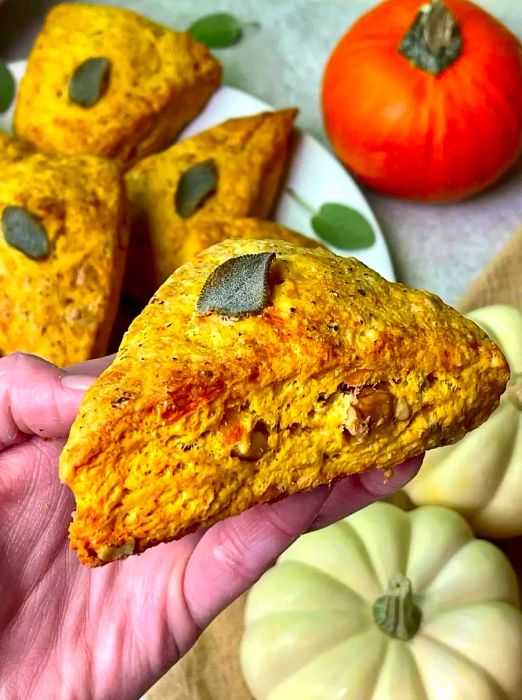
Now, let’s talk about scones—those soft, buttery pastries that make for the perfect breakfast treat. While I’ll admit that the famous Starbucks pumpkin spice scones are undeniably delicious, sometimes I crave a more filling, savory option. Enter the Cheesy Pumpkin Scones with Walnuts and Sage, a satisfying morning bite.
Yes, combining pumpkin with ingredients like fresh sage, Gruyere, Parmesan, and brown butter might seem a bit predictable, but some classics become so for a reason. This flavor pairing is an autumnal triumph. The sweet, earthy taste of pumpkin (accented by a hint of brown sugar) is beautifully complemented by the herbal notes of sage, the richness of brown butter, and the savory tang of cheeses, creating the ultimate fall flavor balance.
Find the Recipe Here: Cheesy Pumpkin Scones with Walnuts and Sage
Still on the fence? If you're ready to give it a try, here are a few helpful tips to ensure your pumpkin scone-making is a success:
1. Chill Your Butter First
Many people keep a couple of sticks of butter in the freezer (a great habit, really), but if you're not one of them, make sure to place one stick of unsalted butter in the freezer for at least a few hours before you plan on making your scones. It’s a small step that requires a little foresight, but it’s totally worth it. The key to flaky scones—and other pastries like biscuits—is super cold butter.
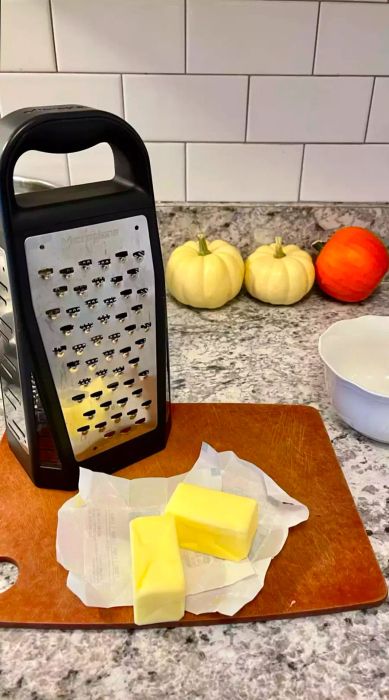
2. Grate the Butter!
Now that your butter is rock solid, grab a box grater with large holes and shred it into fine, manageable bits. These cold butter shavings are perfect for pastry doughs, where you want to incorporate the butter quickly into the dry ingredients to keep it as cold as possible and avoid overworking it. Once grated, I recommend transferring the butter to a bowl and returning it to the freezer until your dry ingredients are ready. If some butter gets stuck to the grater (thanks, friction!), don’t worry—just grate your Gruyere over it next and let the cheese do the job of picking up the extra butter.
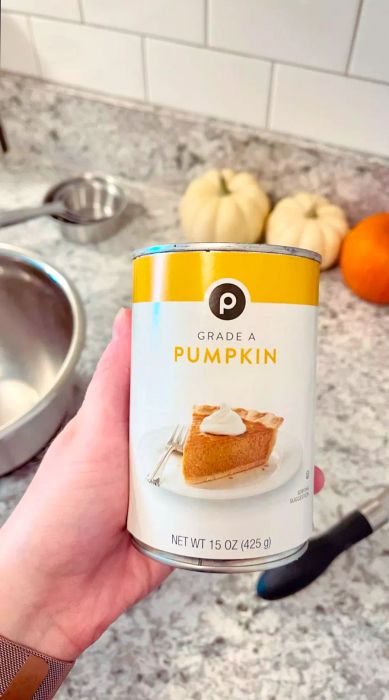
3. Preparing Your Pumpkin for Success
For the pumpkin puree used in this scone recipe, you have two options: You can roast a fresh pumpkin and process the flesh, just like you would for a homemade pumpkin pie, or you can take a shortcut with canned pumpkin. If you choose the latter, make sure you grab a can of plain pumpkin—not "pumpkin pie filling." While both are often shelved together, the pie filling comes pre-spiced, which you don’t want here.
After measuring out your pumpkin puree into a bowl, pause before moving forward and grab a couple of paper towels. Since pumpkin is quite a moist ingredient, it will help your scones to absorb some of that excess liquid. Simply “dab” gently over the puree, pressing firmly enough to soak up the moisture, but without leaving any puree stuck to the paper towels.
4. The Final Touches
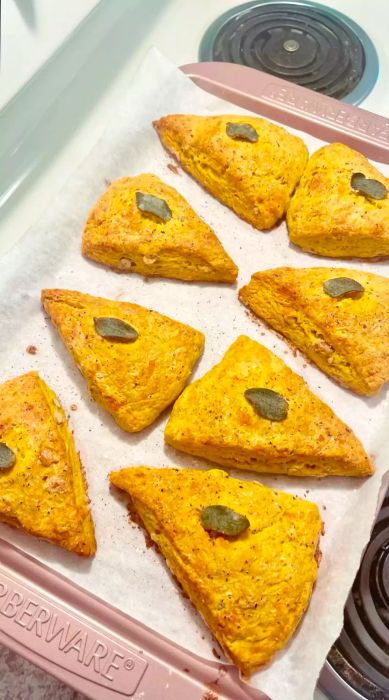
Since these savory scones won’t be getting a glaze post-baking, you’ll want to add your finishing touches before they go into the oven. Start by brushing a generous layer of brown butter and heavy cream over the tops of each scone. This not only intensifies the flavor and promotes a beautiful golden-brown crust, but also helps the toppings adhere to the scones.

Next, sprinkle each scone with freshly cracked black pepper. This adds a sharp, peppery kick and makes the scones visually pop. Finally, press a fresh sage leaf on top of each one. The sage not only adds a lovely touch of green but crisps up in the oven, offering a delightful burst of herbal crunch to complement the scones perfectly.
5. Watch Them Closely
One of the most important moments in the entire scone-baking process is the final stretch. In the last few minutes of baking, stay vigilant and keep a close watch on those scones. You’ll want to pull them out of the oven the moment they reach perfection—golden-brown on the outside with just a hint of sheen. The key is to avoid overbaking; it only takes a few extra minutes for your scones to turn from light, cheesy, fluffy, and buttery-tender to dry and tough, requiring more chewing than is ideal.
The best scones are the ones enjoyed warm from the oven, so let them cool on a wire rack for about 5 minutes before serving. For the freshest taste and texture, it's best to enjoy them the same day they're baked. If you happen to have leftovers, store them in an airtight container for up to two days and reheat gently as needed.
More Pumpkin-Fueled Ideas:
- 15of the Easiest Pumpkin Desserts You'll Ever Make
- Our 20 Best Pumpkin Recipes of All Time are a Fall Sensation
- 23 Healthy Pumpkin Recipes to Make This Fall
- 17 Desserts That Use an Entire Can of Pumpkin
- 10 Pumpkin + Chocolate Recipes That Belong In Your Fall Playbook

1

2

3

4

5
Evaluation :
5/5